1. Introduction
NetSuite not only supports a company’s operations as an ERP, but also provides API capabilities to integrate with external systems. This article shows how to create a custom API in Restlet to send external data to NetSuite and test that API in Postman. It also describes how to set up secure access using token authentication.
2. What is Restlet?
Restlet is a script for building custom APIs in NetSuite to link data between NetSuite and external systems. Specifically, Restlet is used to receive requests from external systems and create or update records within NetSuite.
3. Creating Restlet Scripts
First, create a Restlet script in NetSuite.
To create a script: 1.
From the NetSuite navigation menu, select Customize > Script > Create Script. 2.
Create a new Restlet script and add the following code
/**
 * @NApiVersion 2.x
 * @NScriptType Restlet
 */
define(['N/record', 'N/log'], function(record, log) {

    function createRecord(data) {
        try {
            var expenseReport = record.create({
                type: record.Type.EXPENSE_REPORT,
                isDynamic: true
            });

            expenseReport.setValue({
                fieldId: 'entity',
                value: data.entityId
            });
            expenseReport.setValue({
                fieldId: 'account',
                value: data.accountId
            });
            expenseReport.setValue({
                fieldId: 'subsidiary',
                value: data.subsidiaryId
            });

            expenseReport.selectNewLine({
                sublistId: 'expense'
            });
            expenseReport.setCurrentSublistValue({
                sublistId: 'expense',
                fieldId: 'category',
                value: data.category
            });
            expenseReport.setCurrentSublistValue({
                sublistId: 'expense',
                fieldId: 'amount',
                value: data.amount
            });
            expenseReport.commitLine({
                sublistId: 'expense'
            });

            var recordId = expenseReport.save();

            log.debug({
                title: 'Expense Report Created',
                details: 'Record ID: ' + recordId
            });

            return { success: true, recordId: recordId };
        } catch (error) {
            log.error({
                title: 'Error creating Expense Report',
                details: error.message
            });
            return { success: false, error: error.message };
        }
    }

    return {
        post: createRecord
    };
});
This script provides the ability to create expense reimbursement forms on NetSuite using data sent from an external system.
4. Deploying Restlet
After creating the Restlet script, deploy it to get the URL.
To deploy a Restlet: 1.
From the NetSuite navigation menu, select Customize > Script > Deploy Script. 2.
Deploy the Restlet script you created. 3.
Check the Deployment ID and Status, and set the status to “Released”. 4.
If the deployment is successful, the URL of the Restlet will be displayed. This URL will be the endpoint for access from external systems.
5. Token Authentication Settings
In order to call Restlet externally, NetSuite integration settings and Token-Based Authentication (TBA) must be configured.
To configure integration settings:
1. Create a new integration by selecting Configuration > Integration > New.
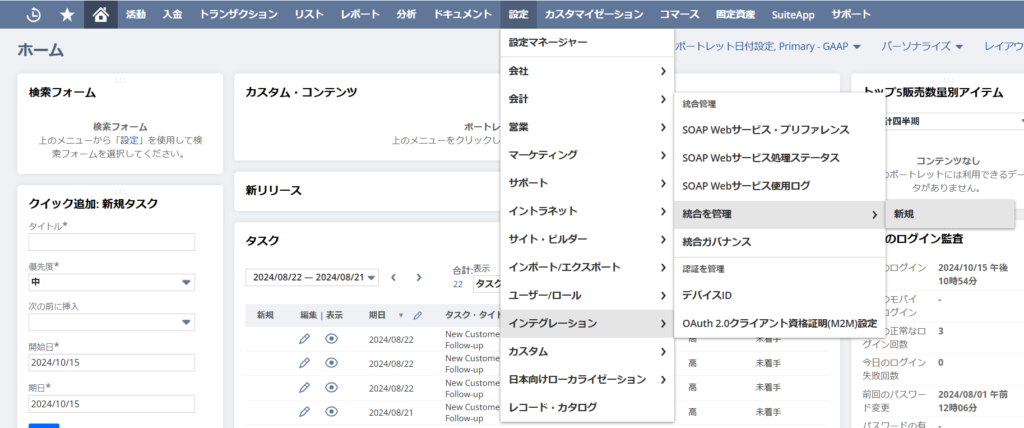
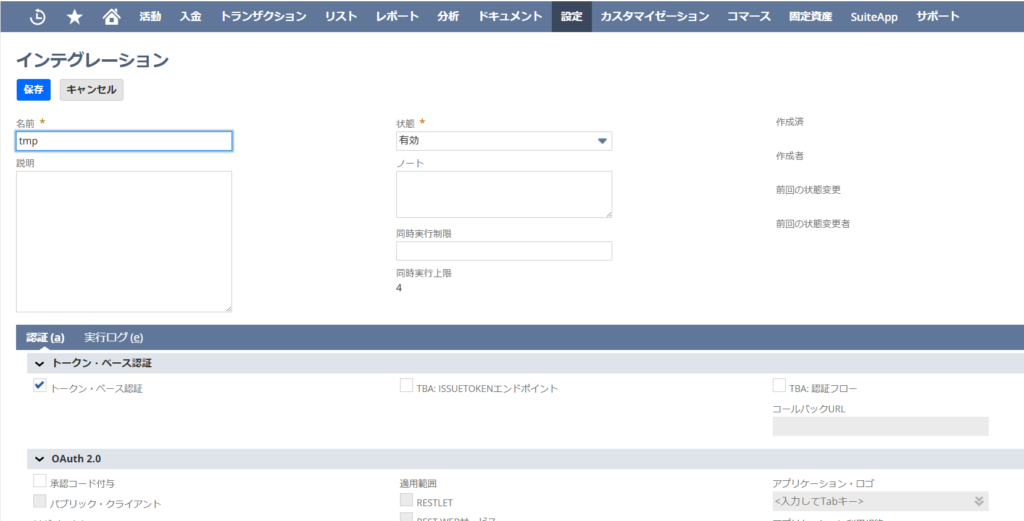
Set the Integration Name and enable “token-based authentication”.
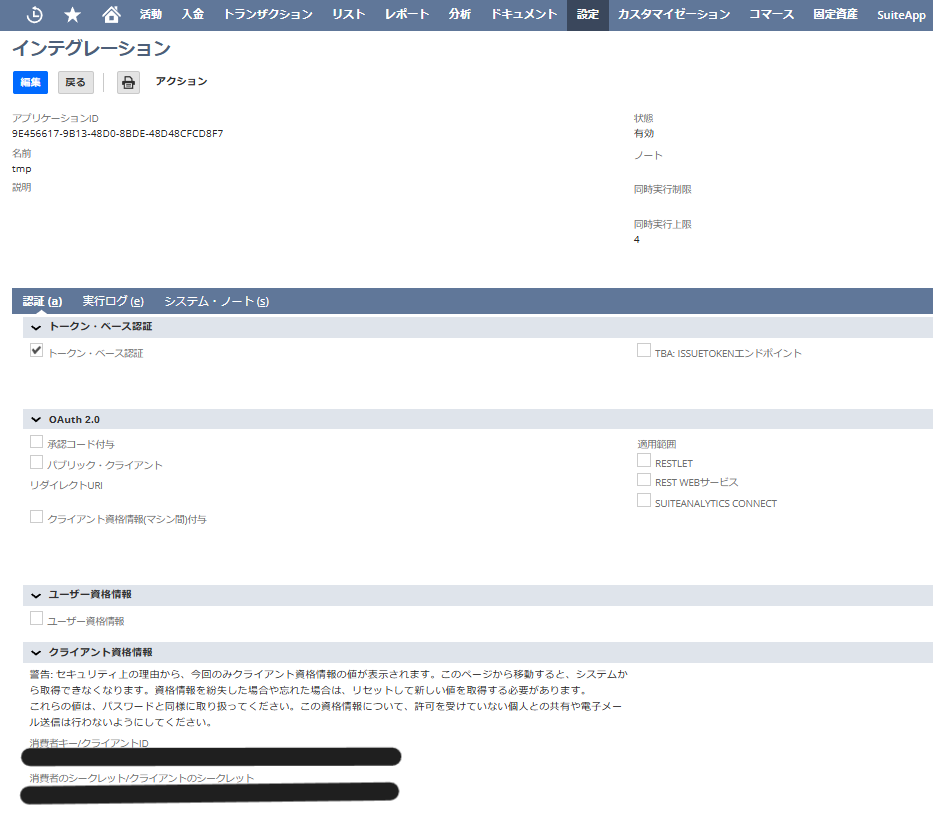
After creation, note the client credentials key and secret key that NetSuite generates. (They will only be displayed when created.)
To set up a token for a user/role:
Select User/Role > Access Token > New.
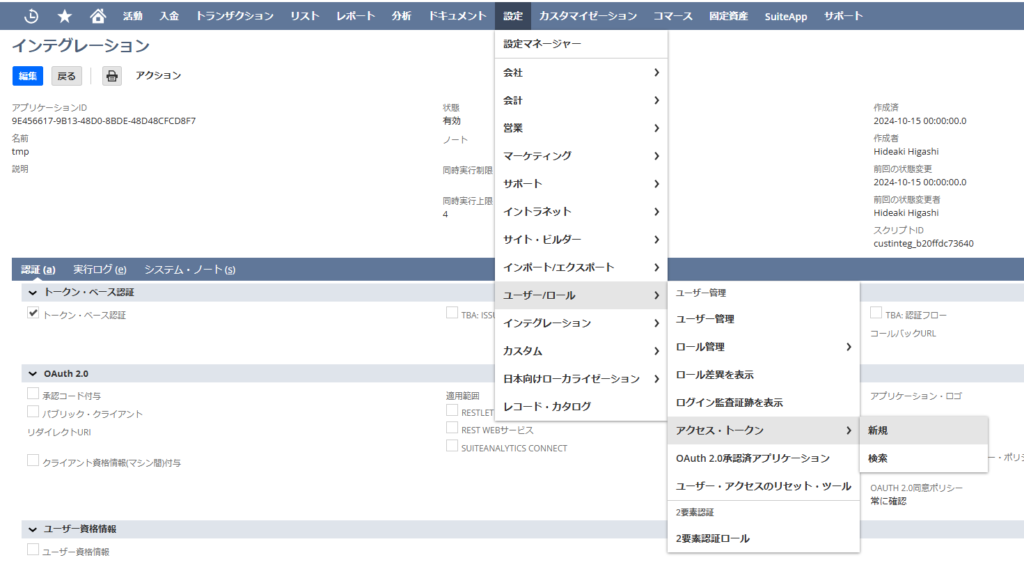
2.select the integration and user/role created in the integration settings and generate a token.

3. Note the token ID and token secret. (They will only be displayed at the time of creation.)
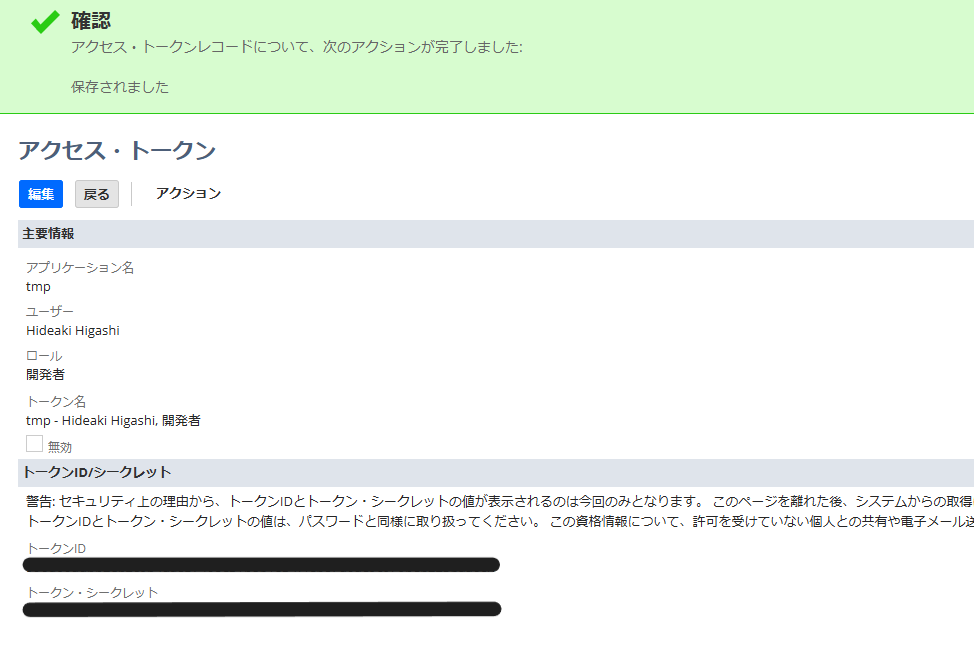
This will allow external systems to access NetSuite’s Restlet.
6. Testing with Postman
統合とトークンが設定できたら、Postmanを使用してRestlet APIをテストします。
Postman Setup Instructions: 1.
1. start Postman, this time creating a new POST request. 2.
For URL, specify the endpoint URL obtained by deploying the Restlet described above. 3.
For Authentication, use OAuth 1.0 issued by NetSuite. Input the following values:
-Consumer Key: value obtained in the integration settings
-Consumer Secret: value obtained in the integration settings
-Token: token ID generated by the access token
-Token Secret: token secret generated by the access token
By setting these credentials correctly, external systems will be able to access NetSuite’s API (e.g., Restlet). 4.
4. set the following JSON data in Body.
{
  "entityId": 123,
  "accountId": 456,
  "subsidiaryId": 789,
  "category": 101112,
  "amount": 500
}
5. After completing the configuration, click the Send button to send the request.
7. Confirmation of results
When you send a request in Postman, NetSuite will create the expense report and return the record ID. In addition, check the NetSuite log to see if “Expense Report Created” is logged to confirm that the data was successfully processed.
8. Conclusion
In this article, we showed how to integrate data from external systems using NetSuite’s Restlet, explaining how testing with Postman makes it easy to verify the operation of the Restlet API and how token-based authentication ensures security while allowing external integration to proceed. The point that external collaboration can be proceeded while ensuring security with token-based authentication was explained. By utilizing this method, secure and efficient data integration between NetSuite and external systems can be achieved.
